 |
|
|
|
|
|
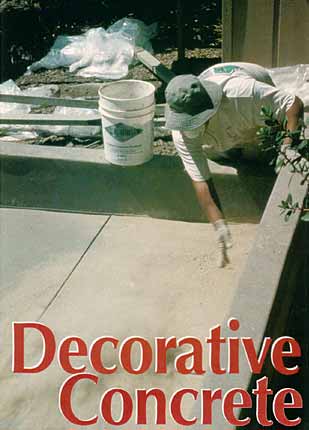
Decorative Concrete
Add color and texture to make concrete look like more expensive materials or to create unique effects
BY DAVID FRANE
When you hear the word "concrete," you probably picture structural elements like footings, foundations, and slabs. And whatever you picture, the material is probably smooth and gray. Yet there are lots of ways to transform this common structural material into an impressive decorative element.
Most decorative techniques involve changing the color and texture of the concrete surface. These methods allow concrete to be used for nontraditional applications like countertops but are most frequently used for flatwork, which is the focus of this article.
The most common treatments make concrete look like more expensive materials such as brick, flagstone, and slate. Skilled finishers can produce stone or tile-like surfaces that are hard to tell from the real thing. But techniques aren't limited to copying other materials. Color and texture can also be used to produce abstract or painting-like effects that are not possible with other materials.
In researching this article, I talked to a number of suppliers and spent time visiting job sites with Tom Ralston of Tom Ralston Concrete in Santa Cruz, Calif. With the exception of stenciling, his company has done just about every kind of decorative concrete there is.
Changing Color
There are a number of ways to color concrete. One of the older methods is to color the surface by exposing attractively colored aggregate. Other methods involve dying or staining the cement that's in the concrete.
Integral color. The easiest way to color concrete is to have the supplier add color pigment at the batch plant. You can also add pigment to the mix after the truck arrives on site. Either way, the concrete is colored before it's poured, so placing and finishing aren't much different than usual. Concrete prices vary widely from area to area, but depending on who you talk to, using integral color may add 10% to 50% to the cost of the material. The labor to finish is about the same as for a standard mix.
Pigments are usually powdered and come in a wide range of hues. You can get reds, greens, yellows, blues, browns, tans, grays, and black. The color will go all the way through the crete, so chips and dings will not be noticeable.
Adding integral color is a simple way to color concrete, but there are ways to mess up. The most important thing is to be consistent, especially for jobs that require more than one load. Each batch should contain the same materials and the same amount of pigment and arrive at the recommended slump - typically 4 or 5 inches. Each batch should be mixed, placed, finished, and cured exactly the same way. Change anything and you can end up with areas that don't match.
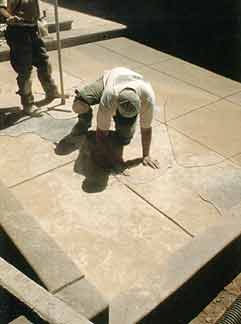
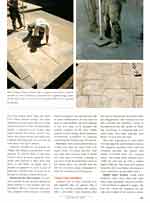
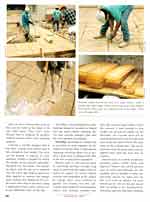
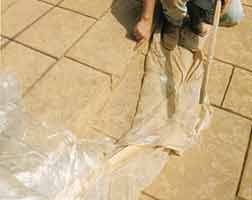
After scoring a damp exterior slab to suggest stone pavers, workers sprinkle on color hardener to change the tint (opposite page). Latex molds taken from actual stone are pounded into place to provide the texture.
Pigment should be measured by weight and added in proportion to the amount of cement that's in the mix. Intense colors are more expensive than subtle ones because it takes more pigment to get them. It might take 3 pounds of pigment to color a yard of light tan concrete and as much as 24 pounds to produce a deep brick red.
Watch out for cold weather. it's common practice to use calcium chloride to speed setting in cold weather. But you shouldn't add it to concrete that's getting integral color because chloride-based accelerators can discolor the slab or cause efflorescence. If you need to pour in cold weather, ask your supplier to use hot water or to increase the cement content of the mix. Other options include using a more expensive nonchloride accelerator or concrete containing fast-setting type III cement.
Hot days. Dark colors absorb heat, so a dark mix may set faster than you expect when it's sunny and dry. That can make the concrete hard to finish and may lead to thermal cracking. If you can't avoid pouring dark colors on hot sunny days, you should tent the slab or use extra curing compound to keep the concrete from drying out.
Using Color Hardener
Another way to color concrete is to add pigment after it's placed. This is done by heavily dusting the surface with a dry-shake color hardener after the crete is floated and the bleed water has disappeared. The moisture in the slab activates the hardener, which is incorporated into the surface by floating, troweling, or stamping with textured mats. The color typically goes about 1/8 inch into the slab.
The main ingredients in color hardener are pigment and Portland cement. The pigment provides color, and the Portland enriches the surface and makes it harder than the concrete below. You could pour material that's 3,000 psi and end up with a surface that's 6,000 psi. The extra hard surface helps the slab wear better and makes it more resistant to freeze-thaw cycles.
Skilled labor needed. Using color hardener takes more skill and labor than using integrally colored concrete. Color hardener is applied in stages. The first two thirds are broadcast on the slab and worked in by trowel or float. The final third is worked into areas that didn't get enough color the first time. The slab is then ready for finishing.
Color hardener comes in a wide array of colors. There's more design flexibility than with integral color because the finisher controls the process. He or she decides how much color to apply and is able to create highlights by using more than one color.
It takes between 60 and 120 pounds of color hardener to color 100 square feet of concrete. Lighter colors typically require more. Most color hardener costs between 35¢ and $1.00 per square foot. But blues and greens are more, costing between $1.20 and $6.50 per square foot. As with integral color, you should avoid using chloride-based accelerators with this product.
Acid Stain
Cured concrete can be colored by treating it with acid stain. The stain, which is made from water, acid, and inorganic salts, can be applied with a roller, brush, or garden sprayer. It's applied to the surface but does not form a coating like paint. Instead, it soaks in and reacts with the free lime that's in the concrete. Free lime is not evenly distributed, so the treatment produces an attractive mottled effect.
You can use a single color, multiple colors, or mix colors on the surface. Geometric patterns can be created by using a diamond blade to score the slab prior to staining. The kerfs can be grouted later on to create a surface that looks like it was tiled. Free-form patterns can be created by masking off portions of the slab and selectively staining the surface.
Manufacturers recommend allowing new concrete to cure for two to four weeks before staining. The slab should be carefully cleaned before treating because surface contamination by oil or drywall dust can mask the surface and keep the stain from soaking in evenly. Check with the stain manufacturer before using any cleaning solution on the slab. And whatever you do, don't acid-etch it first because the acid will react with and "use up" the free lime that's in the slab. The stain won't take if there's nothing in the concrete for it to react with.
It's possible to acid-stain old concrete, but the results are unpredictable because there's no telling what has got ten onto or into the slab in the years since it was poured. in general, colors are likely to be more intense on new material than on old.
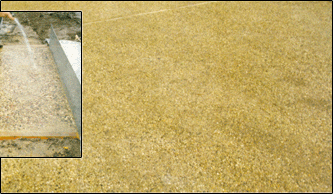
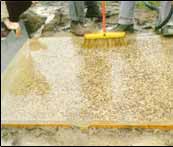
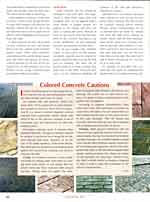
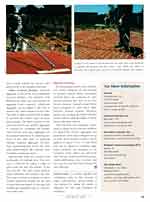
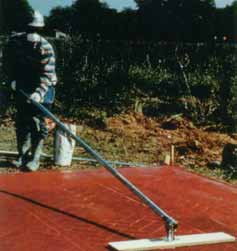
An exposed aggregate finish is the product of a hose and a stiff broom.
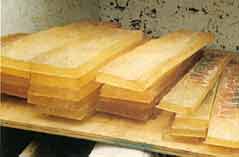
 These pattern stamps work like cookie cutters to produce a cobble paver look. This is an older technology, which has largely been replaced by rubber mat pattern stamps.
Acid stain can be used indoors or out. But it works better on those smooth, hard finishes that are more commonly used indoors. Stain is typically applied in two coats and should be sealed after it dries. A gallon of stain costs about $50 and will color between 100 and 200 square feet. Acid stain is available in many hues of blue, green, black, tan, and red. That said, the range of color is much narrower than what's available with other coloring methods. Acid stain can produce deep colors, but they are usually somewhat muted.
Textured Concrete
Concrete finishers have always used texture to create decorative effects. Simple methods include using a brush to create a swirled or striated surface. Exposed aggregate and salt finishes are a step up from there. Finally, when combined with coloring, techniques like pattern stamping and stenciling can produce surfaces that look like brick, tile, or stone.
Pattern stamping. Stamped concrete was developed in California in the 1950s. The inventor, Brad Bowman, went on to start the company that franchises the Bowmanite system of colored textured concrete. This is a recognized brand name, but plenty of independent concrete contractors produce the same kinds of finishes.
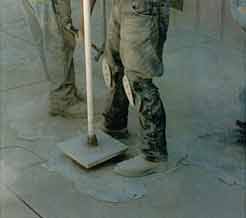
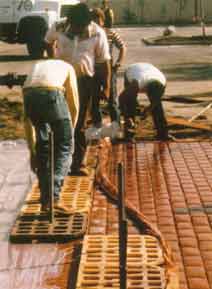
Originally, stamps were like oversized cookie cutters that were pressed into the surface of the wet concrete. They came in sets and mated edge to edge so that continuous patterns could be impressed. Nowadays, however, finishers are more likely to stamp concrete with flexible rubber mats and skins. The bottom face of these stamps is contoured to produce various textures and patterns when tamped onto the surface of wet concrete.
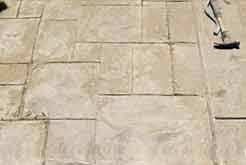
Mats are around 3/4 inch thick and can be as small as a single brick or as large as a 3x5-foot section of flagstone. Sets can be placed edge to edge to produce continuous patterns over broad areas. An incredible number of patterns and textures are available. A few examples of patterns are cobblestone, flagstone, ashlar, herringbone, fan, and various brick bonds. Textures include, but aren't limited to, brick, slate, bluestone, tile, seashells, and wood plank.
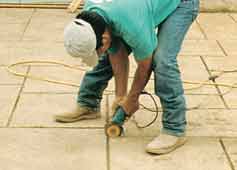
Textured rollers provide the look of a stone surface, while a grinder (top right) helps create convincing grout lines. Rubber form liners (above) give an authentic look to the edges of the concrete steps (left).
Skins are much thinner than mats, so they can be curled at the edges to fit into tight spots. They don't mate because they're designed to produce random textures rather than repeating patterns.
Concrete is usually stamped after it has been colored and floated and is firm enough to bear weight. The color can be integral or applied as color hardener. Texture is applied by laying the stamps on the concrete and tamping them into the surface. The stamps are lifted, and the process is repeated over the entire slab. Release agents are often applied to prevent the stamps from sticking and pulling up the surface layer when they're removed. Using a pigmented release agent allows you to put additional colors on the slab.
According to the manufacturers, color hardener should be troweled or floated into the surface before stamping, but I've seen concrete stamped right after the color hardener was applied.
Stenciling. Stenciling is a simple way to put brick or stone patterns on the surface of concrete slabs. Unlike pattern stamping, stenciling allows you to produce a wide array of patterns with little in the way of specialized equipment.
Stencils come in rolls and are made by punching openings through long strips of water-resistant paper. Strips of stencil are placed on freshly floated concrete and embedded in the surface by rolling. Next, color hardener is applied and floated into the slab. Texture can be added by embossing the surface with textured cylinders that look like oversized paint rollers. When the concrete is hard enough to bear weight, the stencils are pulled up and discarded. The exposed areas will be colored and textured, but the parts that were under the stencil will be the same color as the original mix. The uncolored areas look like grout joints and are slightly lower than the areas that are colored.
Stencils come in a variety of patterns, including ashlar, cobble, brick, and flagstone. Borders and curved patterns such as circles and fishscales are also available, and it's possible to order custom-made stencils for logos and the like. Cost varies by pattern, but most stencils go for 30¢ to 60¢ per square foot. According to the manufacturers, stenciling takes less skill than stamping and is easily learned by anyone who knows how to do standard flatwork.

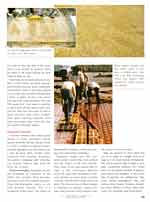
A plastic brick stencil is first floated into the slab; then color hardener is applied and floated into the surface (left). When the stencil is removed, the original gray concrete is exposed as grout lines (above).
David Frane is a finish carpenter and contributing editor to The Journal of Light Construction. Special thanks to Tom Ralston for taking the author to numerous job sites and explaining his techniques.
For More Information
Artcrete
Natchitoches, La.
318/379-2000
www.artcrete.com
manufacturer of stencils, information on using stencils
ConcreteNetwork.com
866/380-7754
www.concretenetwork.com
information, contractor list
Decorative Concrete Net
www.decorative-concrete.net
information, contractor list, training
Portland Cement Association (PCA)
Skokie, Ill.
847/966-6200
www.portcement.org
information
The Stamp Store
Oklahoma City, Okla.
888/848-0059
www.thestampstore.com
supplies, training, informative website, excellent newsletter
Other textured finishes. Exposed aggregate is one of the more traditional textured finishes. The finished look depends on color, size, and amount of aggregate that's exposed. Additional aggregate can be added to the mix or seeded onto and troweled into the slab. The slab is then sprayed with retarder to prevent the surface layer of paste from setting. The lower portion of the slab is allowed to set, and the aggregate is exposed by scrubbing the surface with a broom and water. Aggregate can be exposed selectively by masking portions of the slab prior to applying retarder. Exposed aggregate can produce representational forms like trees and natural effects like concrete that resembles eroded sea stone.
Salt-finished slabs are covered with pockmarks of varying sizes. This texture is achieved by using a roller to press rock salt into the surface of the wet concrete. The slab is later washed, which dissolves and removes the salt. This type of finish is popular in warm western states but should not be used in areas that are subject to freezing. Salt finishes are normally used in conjunction with color.
Polymer Overlay
The techniques used to color and texture exterior flatwork can also be used to produce interior floors. Decorative concrete floors are common on commercial projects but less so in residences because framed wood floors aren't designed to carry thick slabs. Polymer cement overlay, however, allows you to bring decorative finishes inside without adding weight or thickness to the floor system.
This material was originally developed to repair worn concrete surfaces. It's made from cement, aggregate, and proprietary resin and is designed to go on thin. Most polymer cement can be applied in layers 1/4 to 1/2 inch thick and can be spread to a feather edge. Some products are designed to be troweled, while others are self-leveling. Polymer overlays will bond to plywood subflooring, new concrete, and old concrete that has been cleaned by shot blasting.